
The flow and installation sheet..................
I plan to plumb in a hyd. auto pilot later on. BTW there is now a on/off selecting steering lock valve between the pump and safety & bypass valve. No pictures yet. Originally the pump had a built-in wheel lock valve but when the weather got hot it would build pressure in both lines (up to 1500 psi) making the wheel hard to turn on the first use of the day. I complained to Kobelt.

To order the system I had to send in a spec sheet for the boat and Kobelt recommended the items below.
Originally the boat came with only tiller steering but the cockpit was cut to take a wheel system. I decided to go with hydraulics since I have some expertise in the field and I don't like backlash. I chose a Kolbelt system due to them being right close in Vancouver, BC and mostly it's construction.

First thing I did was lay out a plan and order up all the materials including bronze and SS hyd. fittings.

Then it was to remove the old mainsail traveller system and mount the hydraulic backstay pump back where the motor gauges use to be, since they were being moved up to the new pedestal.

Then it was deciding where the traveller was going to sit. I set it on the cockpit deck and moved it around until the wheel looked like it was in a good spot, not smashing my fingers if I went a full circle with my hand. I went with the largest wheel thinking it would be best while heeled but later found out it wasn't necessary.

I drilled a small hole in the middle of the traced mark and went below to make sure it's position would work out. It was close to perfect as I could get.

I cut out a rectangle the same size as the opening in the pedestal column. Then built a wooden dam just to fit the inside of the pedestal foot.

Then epoxy/glassed over the dam and painted. The pedestal has a large grove on the underside which look like it was meant for a 5/16" cross section o-ring. So using contact cement I glued in a full circle o-ring and bolted the pedestal down with aluminum bolts.

So now even if the o-ring leaks a bit it still can not go down the hole.

I ran a hose in the cockpit to test the system. No leaks.

The old cable type quadrant wouldn't work so it had to go. And since I was going to put in rollers for the pivot of the rudder I pulled the rudder.

Since the boat is on the hard I had to dig a 3' deep hole for the rudder to go in just to get it out.

I put a stud with 2 nuts inside the rudder post and tied a line to that.

I tied a block to the backstay and ran the main halyard with a secondary line thru that to lower the rudder.

After the rudder was out I replaced the upper bearing. It see to be too loose to my specs.

I stripped the paint from the rudder and checked for possible problems and the shaft. I groved out the joint between the shaft and rudder then filled that with 3M-4200 sealant.

Then epoxy/glassed over the whole rudder and new seal.

Faired it in smooth and laid on a couple barrier coats.

I built a new quadrant form aluminum with hardened bushings pressed in the holes which were the recommended center-to-center distances by Kolbelt with an optional hole for more lock-to-lock distance if I needed it.

Also machined in a couple pockets for rollers. As well, I machined a thrust plate that was perpendicular to the shaft, unlike the old teflon shim that was under the old quadrant. I made it in two halves so it could be taken out w/o pulling the rudder, if I needed, for resurfacing for height. It turned out to be just right. Then put a couple coats of good primer to protect the aluminum.

The next task was to get it laid out on the inside of the hull according to the Kolbet specs.

I used a level and some string to get the angles and position.

Then build a support....................

And epoxy/glass it in with gussets for strength.

On top of the support is a SS plate to bolt thru to keep the bolts from working the wood. Also there will be a couple bolts going thru the hull to the outside with a backing plate for extra strength.

The only flexible hoses are these two shorties (2200 psi rated) for a little movement of the cylinder and a couple 5000 psi 1/4" going to the gauges up at the pedestal (will explain later). Every fitting is non-corrosive except theses two hoses. Just one SS hose fitting cost more then the two hoses w/fittings installed.
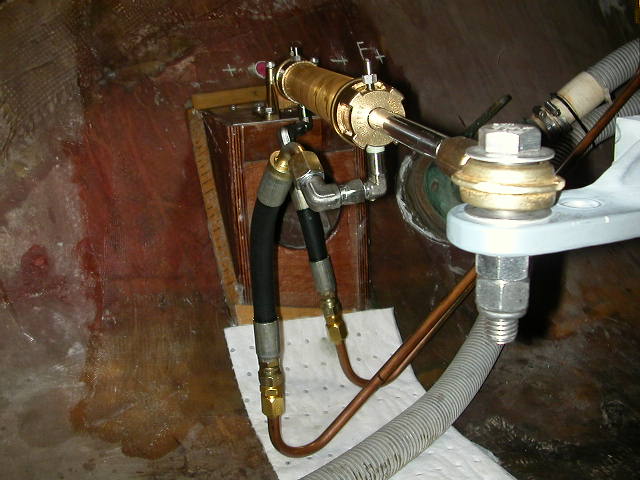
A view looking aft into the transom, to this point.

The head tank is mounted out board of the cockpit, below deck, just above the level of the pump, as per the Kobelt instructions. I use the Navtec 10W oil because of it's anti-moisture additives.

Next I built an adjustable mount for the hyd. pump from 316 SS angle.

Here it's bolted to the bottom of the pedestal with 5-1/2' of (expensive) SS roller chain.

Here's the safety/bypass valve in the inside of the transom, on the back of the cockpit.

Here's the bypass handle from the cockpit side (the silver star).


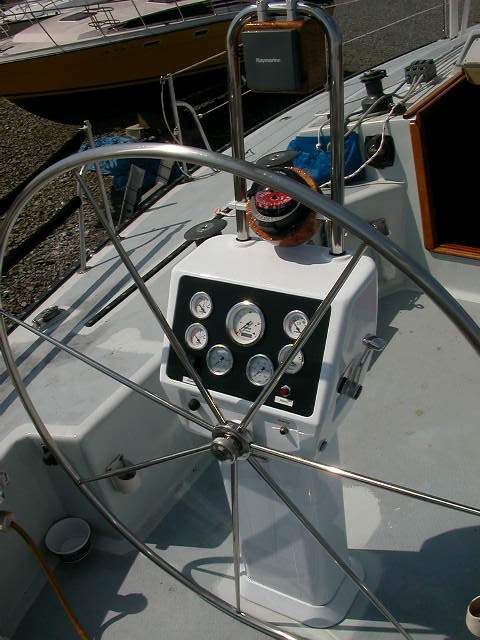
The two lower gauges are for port & stbd back pressure from the cylinder. So if I'm getting any feed back from the rudder a gauge will read weather/lee helm. This allows me to adjust my sails to the least amount of helm. The boat balances out and sails itself, most of the time.
The center gauge is the tach then I have the oil pressure, water temp, amp meter and fuel gauges. And then the shift/throttle control on the right with the key below, and the stop button on the left. Also have installed a switch for a blower in the engine room (for cooling purposes on really hot days).
During the first year after the hyd. installation, while the boat was on the hard, I would notice that both of the helm gauges would climb up as high as 1000 PSI on the hot days. This was due to the internal wheel locks on the back of the pump. I'd turn the helm and they would drop off to zero again. The heat expansion was causing pressure on both side of the pump creating a false back pressure.
I called Kobelt and told them of the situation and all I got was a Hummmm!
The next year they came out with a manual wheel lock valve and a kit to bypass the internal lock. So I ordered one.
Below is the system I built to operate the lock from below so it wouldn't get in the way of the other stuff and lines up in the cockpit. Here is a push/pull lever with the black ball on the end...........

The other end of the push/pull lever with a clevis and push rod going thru the bulkhead.


And the new lock valve also mounted to the underside of the cockpit deck just aft of the helm pump.
I leave it open when motoring or while moored, and close it when sailing.

Here's the pedestal to date. The spoked antique wheel I changed out for the big one for a couple reasons.
1) The hyd. system was very easy to move. I could just spin the wheel lock-to-lock. EZ to steer!!!
2) I went to a smaller wheel to get around the pedestal w/o going up on deck, which was inconvenient.
The new spoked wheel is an antique Edson that I had re-plated and made maple burl knobs to match the maple burl instrument holders up above the gauges.
As well, there's a fish finder, GPS, Tack-tick wind display, compass and Raymarine tiller pilot above the gauges.
And as you can see the main boom traveller is head high mounted to an arc, which I'll get into later.

Thanks so much for this Blog,
ReplyDeleteIt is freaky reading about this restoration, I bought a 1979 Dubois 40', about 6 months ago, also via ebay ex insurance write off, only difference being the mast and standing rigging were still missing so I got to replace them too.
There are so many similarities with the issues on the two boats it is like you are writing me a renovation manual.
I am at about your 2010 level on my restoration and am getting some great ideas and info from you.
Hope in a few years mine comes up as nicely as yours has.
Thanks again
Keith
Once More Dear Friends
Hi Keith,
DeleteWell, I hope you are not as old as I was when I started! At 51 is not a good time to start on a large project as this was. Right now the boat is back on the hard for one more yellow coat and new bottom paint, at 64YO. It's not fun anymore! But I sure get a lot of compliments on her. So now it's time to enjoy the fruit of my labor.
One bit of advice. If you find its getting to be too much, dump it before you're too far into it. With me it was the youth that was running out.
Enjoy!
Delmarrey--- I have a cockpit that I am in the planning stages or refitting... I would like to get your feedback on this if you do not mind and have the time to chat about this?
ReplyDeleteThanks...
Thomas
S/Y Explorar Conmigo
Hi Thomas, Sure I'd be happy to help anyway I can. I'll try to reply a bit sooner. Maybe a direct email would be better.
DeleteDel