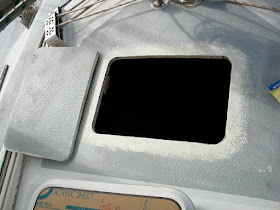
The underside had a wooden frame (mahogany) that was coming apart at the corners but was still in good shape. It was removed, epoxied back together and covered with 1 oz FG. Then was epoxied back in place, and held tight with the mounting bolts. Then more epoxy filler around the outer edges for even more strength.
The cast aluminum hatch frame was in OK shape but the paint was flaking off. I sand blasted it and took it to be powder coated. One problem became evident. When you heat up cast aluminum (for powder coating) the pores in the casting expel gas causing the powder coat to bubble while hot. When it cools it's left with lots of pits in the coating going right down to the aluminum.
So, after an expensive powder coat I roughed up the finish with course scotchbrite and painted it with two coats of boot stripe paint. I've found that boot stripe paint is pretty tough stuff and it can always be lightly sanded and repainted.
I found that with the inside and outside frames removed that the deck forward of the hatch was really flexible. So I had to be carful where I was, while working on the flatness of the hole.
First I knocked out all the filler that was around the surface. Which it probably why is had been leaking from the evidence.
Then built up the surface with FG and epoxy filler and ground flat. Then covered with a couple layers of FG/epoxy.
Sanded, re-drilled the holes and painted.
Sealed in the rebuilt hatch. Also put in a new lexan cover and added non-skid to the surface (not shown) and installed a new quality lip seal.
The two smaller hatches were originally installed with the open side forward. Not good when you take a wave or spray over the bow. Also the genoa sheets would get caught up in the cover, while tacking, if they were not locked down. So, I reinstalled them facing aft.
Before the reinstall I sealed the core and filled the holes with epoxy filler and re-drilled the holes.
One of the small hatches did need a new lip seal and was installed.
The solon had little to no ventilation and since there was space I decided to put in a hatch just aft of the mast.
I bought the Bomar hatch off of ebay for a really good price. After it arrived I laid out the dimensions and cut the deck out and ground off the nonskid.
I did have to cut thru a cross beam but it's only for hanging the headliner materials.
Cut some mahogany strips, some straight and some tapered to fit the arch of the deck and epoxied them in place.
After it cured I sanded the wood flat and fit the hatch.
Next was fairing in the corners and deburr.
Drilled the holes and laid filler in the corners for a radius fillet.
Covered with two layers of FG/epoxy.
Sand smooth and paint.........
Mount and seal the hatch, also facing aft.
From the inside.................
And as completed, so far........................
Then of course there was the cockpit water tight ports, which help vent out the boat extremely well.
All cores were sealed, of course.


No comments:
Post a Comment